The Raspberry Pi is a small, versatile computer that can be used for a wide variety of projects, including creating a remote security system with multiple cameras and an alarm. With the right hardware and software, a Raspberry Pi can be used to monitor and protect your home or business from anywhere in the world.
In this blog post, we will discuss how to use a Raspberry Pi as a remote security system with multiple cameras and an alarm.
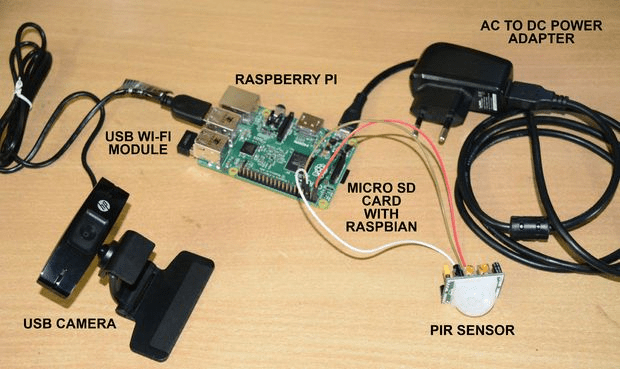
Step 1: Gather the necessary hardware
- Raspberry Pi (any model will work, but the Raspberry Pi 4 is recommended for its powerful processing capabilities)
- Micro SD card (at least 8 GB)
- Power supply for the Raspberry Pi
- IP cameras (for remote monitoring)
- Alarm system (can be purchased or DIY using a buzzer or siren)
- Optional: motion sensor for added security
Step 2: Install the operating system on the Raspberry Pi
- Download the latest version of Raspbian (the official operating system for the Raspberry Pi) from the Raspberry Pi website
- Use an SD card writer to write the image to the micro SD card
- Insert the micro SD card into the Raspberry Pi and turn it on
- Follow the on-screen prompts to complete the initial setup of the Raspberry Pi
Step 3: Connect the cameras to the Raspberry Pi
- Connect the IP cameras to the Raspberry Pi via Ethernet or Wi-Fi
- Use software such as MotionEye to manage and stream the video feed from the cameras
Step 4: Set up the alarm system
- Connect the alarm system to the Raspberry Pi’s GPIO (General Purpose Input/Output) pins
- Use a scripting language such as Python to create a script that triggers the alarm when motion is detected or when other security conditions are met.
Step 5: Create a script to automate monitoring
- Use a scripting language such as Python to create a script that automatically monitors the camera feeds and triggers the alarm when necessary
- Use the script to analyze the video feed using computer vision techniques to detect potential intruders or other security issues
- Optionally, use a cloud service such as AWS IoT or Microsoft Azure IoT to send alerts to your phone or email when motion is detected or the alarm is triggered.
Step 6: Access the system remotely
- Use a secure connection (such as SSH or VPN) to remotely access the Raspberry Pi and view the camera feeds
- Use a web server (such as Apache or Nginx) to create a web interface for accessing the camera feeds and controlling the alarm system from a web browser
Creating a cyberpunk-inspired remote security system with a Raspberry Pi and multiple cameras can be a fun and rewarding project for anyone interested in technology, cyberpunk, or home security. With the right hardware and software, a Raspberry Pi can be used to monitor and protect your home or business from anywhere in the world, giving you peace of mind and added security.
#RaspberryPi #SecuritySystem #RemoteMonitoring #DIYSecurity #Cyberpunk #HomeSecurity #Surveillance #IPCameras #RaspberryPiCamera #AlarmSystem #DIYProjects #SmartHome #HomeAutomation #IoT #RPiProjects #DIYSurveillance #ComputerVision #VideoSurveillance #RaspberryPiHacks #RaspberryPiTips #RPiSecurity #CyberSecurity #DIYAlarm #RPiAlarm #MotionDetection #RPiMotionDetection #Cybercrime #HackProof #SmartSecurity